3d Printer Bed Leveling 2022
Much of the magic of FDM 3D printing is in the filament. The material behaves predictably at certain temperatures, making it possible to control its form, enabling us to produce a 3D printed object.
There are several key variables you must consider when using a 3D printer in order to get a high-quality, successful print. And one of the most impactful is a level print bed because it increases the likelihood that material will be extruded evenly across the entire build surface.
In this article, we’ll be going over everything you need to know about leveling the bed, starting with how to identify problems. Later, we’ll also discuss when and how you should adjust the Z height, which can sometimes come into play.
When to Level the Bed
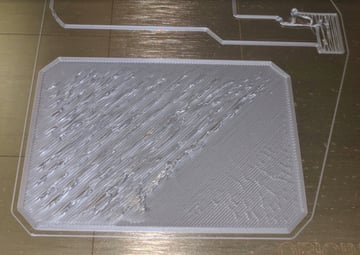
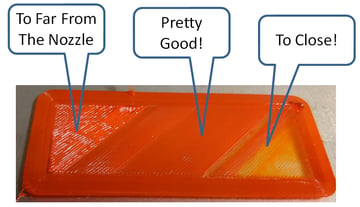
A level build plate should result in a consistent first layer. Visually, it will look like nicely “squished” lines all the way through. Often, it’s pretty obvious that something’s off with the first layer, and sometimes, that’s the result of an unlevel print bed.
Here are a few common signs of an unlevel bed:
- The filament doesn’t stick to the build surface in certain areas.
- Filament does not leave the nozzle in some places.
- The filament’s height and width varies across the build surface.
- The gaps between lines of filament vary across the build surface.
Now we know what to look for; let’s get into what you need to fix it!
Required Tools
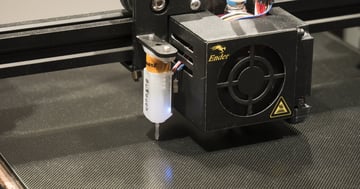
The quickest and easiest way to fix problems related to an unlevel bed is to use an auto bed leveling (ABL) sensor. There are various types of leveling sensors. Regardless of the technological differences among them, they all basically measure the distance between the nozzle or sensor and the build surface. In addition to the sensor, auto bed leveling also requires a firmware update that translates the input data from the sensor to the printer, so that’s important to keep in mind as well.
Even with auto bed leveling, however, it can be a good idea to periodically level the bed manually because automatic systems don’t actually level the bed. Also, if you are more familiar with your printer’s components, you will be more capable of fixing anything if it goes wrong.
Manual Bed Leveling
For those of you who haven’t installed an ABL sensor yet, you’ll have to level the bed manually. Here’s a good starting set of tools you’ll need to do it:
- Paper: You’ll want a piece of paper that you can comfortably hold and slide between the nozzle’s tip and the build plate. Anything from standard printer paper (cut down to size) to a business card will work, as long as the paper holds its shape. The important thing is always to use the same paper, during and across leveling sessions.
- Screwdriver or hex key: Your 3D printer’s bed may require one of these tools to adjust screws on the bed (if it doesn’t have rotating knobs).
- Heat-resistant gloves: Protection is important when you’re working near the nozzle. Some gloves like these ones from Rapicca, are useful.
- A clean cotton cloth and a brass brush: A clean nozzle is a happy nozzle. A mini brush (or something similar) is nice to have.
- A razor (or plastic) blade or a spatula: Scraping residue from the surface of your build plate is easy if you have something like the BuildTak spatula. Or, blades can work, but you want to be careful not to scratch your build plate.
- Dish soap and a clean, dry cotton cloth: Easily remove dust and grime with these common household items.
- Isopropyl alcohol: A staple for every 3D printer owner, IPA allows you to clean a build surface that’s permanently mounted to the 3D printer. Just check that the build surface can handle the cleaning agent.
Preparation
With all your tools assembled, you’re ready to make some adjustments… almost! Before tackling the hardware, we need to ensure everything is clean.
Clean the Nozzle
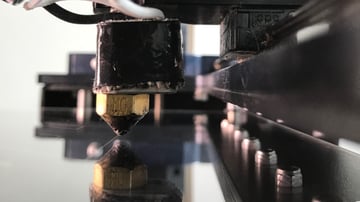
First things first! If you have any residual plastic on the tip of the nozzle, your bed-to-nozzle gap will be off. Thankfully, the tip is easy to clean with a dry cotton cloth.
Heat the nozzle to the temperature the last-used material was printed at and wipe off the excess plastic. If that doesn’t do the trick, a brass brush may be used to carefully clean around the tip. Just be careful not to overdo it, otherwise, the nozzle may be damaged by the hard brass bristles.
When working close to the hot end, be sure to observe proper safety practices like wearing heat-resistant gloves and using common sense.
Clean the Build Surface
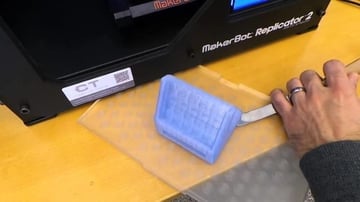
As with the nozzle, your 3D printer bed’s surface should also be clean. For a glass build surface, we can mostly use a razor blade or a spatula to scrape off any large residue and debris. The blade will also work for other hard build surfaces, but be sure to not use it on a build plate that might be easily damaged, such as one with a PEI coating.
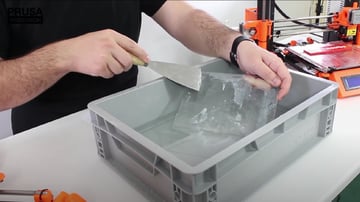
Once large debris is removed, we can proceed with washing the build plate. If it can be removed, cleaning it in the sink with ordinary dish soap and lukewarm water works quite well. For a non-removable build plate, you can use isopropyl alcohol on a paper towel or cloth. After that, dry it with a soft cloth.
It’s a good idea not to touch the clean build surface with your bare hands because this can deposit oil from your skin to the plate. We don’t want any grease on the surface, as that can adversely affect bed adhesion. For different types of build surfaces, other techniques may apply, so be sure to check what you have to avoid damaging its surface.
Hot or Cold?
For the bed leveling process, it doesn’t matter if the bed and nozzle are hot or cold unless you plan to only print with one set of settings. In this case, heating up to those temperatures before leveling can help to ensure your level is exact (because materials expand slightly when heated), but this isn’t strictly necessary.
Bed Leveling
Manual 3D printer bed leveling can be a frustrating experience even for seasoned makers. However, as soon as you understand the basics of the process, you’ll easily master this useful skill. Here’s how to do it.
Step 1: Create Some Workspace
Most FDM 3D printer beds are mounted with four adjustable screws in the corners of the build plate. Adjust each screw a couple of turns to increase the distance between the nozzle and the build plate. (If “touching up” a leveling job done not too long before, you may not need to do this.)
Step 2: Position the Printhead
Now, you want to get the nozzle close to the build plate. To do this, simply home your print head using whatever method your printer or control software provides.
This will send the nozzle to what the machine considers to be position (0, 0, 0) in the build volume’s space. What’s important is that third 0, which represents the Z coordinate or height, because it’s at this height that your machine will print the first layer.
Lastly, disable (or unlock) the stepper motors so that you’re able to freely push the printhead within the XY plane. Again, this should be an option provided by your printer’s firmware. Be careful not to push it too quickly, as this can create a charge in the motor.
Step 3: Measure and Adjust
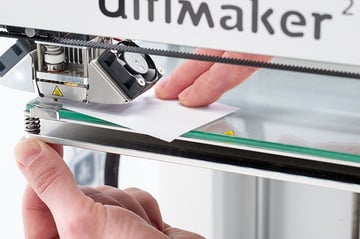
You want to calibrate the 3D printer bed so that it’s as level as possible at all four corners and in the middle. In theory, the nozzle should just touch the build plate at these locations, and this is why we try to pass something thin between them – such as a piece of paper. Reaching the point just before experiencing resistance while sliding the paper around ensures that the “gap” is correct and consistent at all five locations.
Move the printhead to a corner of the bed and put your paper between the nozzle tip and the print bed. If there’s no resistance when dragging the paper back and forth between the nozzle and the bed, adjust the closest leveling screw to tighten the gap. Be careful not to put pressure on the 3D printer bed (for example, with your hand), as this will push the bed down enough to make the gap bigger than it really is. Sliding your paper repeatedly, keep adjusting the screw until you can feel a slight drag from the nozzle and 3D printer bed.
Repeat this same process on all remaining corners. When the corners are okay, move the print head to the middle of the build plate and check that the same resistance can be felt there. Readjust the screws if necessary.
Lastly, double-check each corner and the center again, as your adjustments in one corner may have affected the others. If that’s the case, repeat the entire procedure until all five points are leveled.
Step 4: Inspect the First Layer
Before running a complete 3D print job, it’s a good idea to print only the first layer in order to verify successful bed leveling. If successful, the first layer should look more or less the same over the whole surface. If not, you may need to further adjust your level.
Adjusting the Nozzle Gap
Bed leveling and adjusting the Z height are often discussed together. Generally speaking, there are two ways to adjust Z height, and they’re done at different times.
The first way is to set it via firmware, making it something of a “fixed” value that’s usually only changed when you are calibrating your printer. The second way is to set it via your slicer (perhaps as “first layer height”), and this is something one might choose to adjust before a particular print job depending on the material, type of print, or type of bed.
Either way, it’s important to know that adjusting Z height isn’t typically something that’s done as often as bed leveling. You shouldn’t have to be adjusting the Z height in order to compensate for poor bed leveling. In theory, the firmware’s Z height should be properly set before bed leveling so that, when your nozzle reaches its home position, (0, 0, 0), that third 0 is in the right place.
Relying too frequently on Z height to achieve the right gap between the nozzle and print surface could result in you reaching an extreme (like the lowest possible Z height), which won’t allow for future adjustments.
When to Adjust Z Height
While we caution against frequently adjusting the Z height, sometimes it is necessary. Here are some signs that the nozzle gap might need to be tweaked.
SIGNS THE NOZZLE GAP IS TOO SMALL:
- The first layer is barely visible or very thin.
- Little to no filament is being extruded onto the build plate.
- Filament gathers on the nozzle.
SIGNS THE NOZZLE GAP IS TOO LARGE:
- Filament doesn’t stick to the build surface.
- Filament comes out like spaghetti.